Previous Page (Making the veg patch 2007-8)
Index:
- Page 1 Making the veg patch 2007-8
- Page 2 Creating a Cropping Plan and Crop Rotation (this page)
- Page 3 2008-2012 Asparagus Bed
- Page 4 2012 Raised Beds and Windbreak
- Page 5 2014 Woven Weed Suppressing Membrane
- Page 6 Before/After Photo Gallery
January 2009
I’ve made a plan for when/what to do, but my efforts to upload the HTML here have failed miserably, so here’s a rather large image of my Veg Plan 2009

Veg Planner 2009 v3 - 16Mar'09
Click for full sized version

Crop Plan v3 - 16Mar'09
Click for full sized version
This Crop Plan is just an Excel spreadsheet. The cells approximate to 1M length of the row, so its sort-of to scale. I merge adjacent cells and then put the variety name in – that way of the dog eats the label I still know what-was-where.
The smaller Plant Greenhouse is completed. This will be used to raise seeds and plants, mostly for the house, and complements the Cropping Greenhouse which was completed last year and which I use to grow Tomatoes and so on. I’ve sown a few Freesias, Cyclamen and Stretocarpus to have something to show this year.
To help germinating my seeds this Spring I bought an Electric Propagator (click to see my blog post about it). I’m pleased with it, so far.
I’ve been waiting a while (nearly two years now!) for the local farmer to bring the (now huge …) pile of horse manure up to the garden, but he’s a busy one-man-band chap; anyway, as luck would have it, one of the other farmers nearby was tidying up the hedges along the lane today and I went out to ask if he could just do the tops of mine – something I was planning tog et around to during the winter … the sides are done, just the tops left. “I don’t suppose you’ve got any muck have you?” to which the joyous answer “About 100 tons, its all at least 4 years old”. Perfect! Not sure even I can get through 100 tons, but all the trees have been planted without any muck, so need mulching, and I need to put a generous layer on the vegetable patch, the shrubbery and the herbaceous garden (which I plan to plant this spring) – plus all the newly planted trees and hedges. I should be fit by the time Summer gets here!
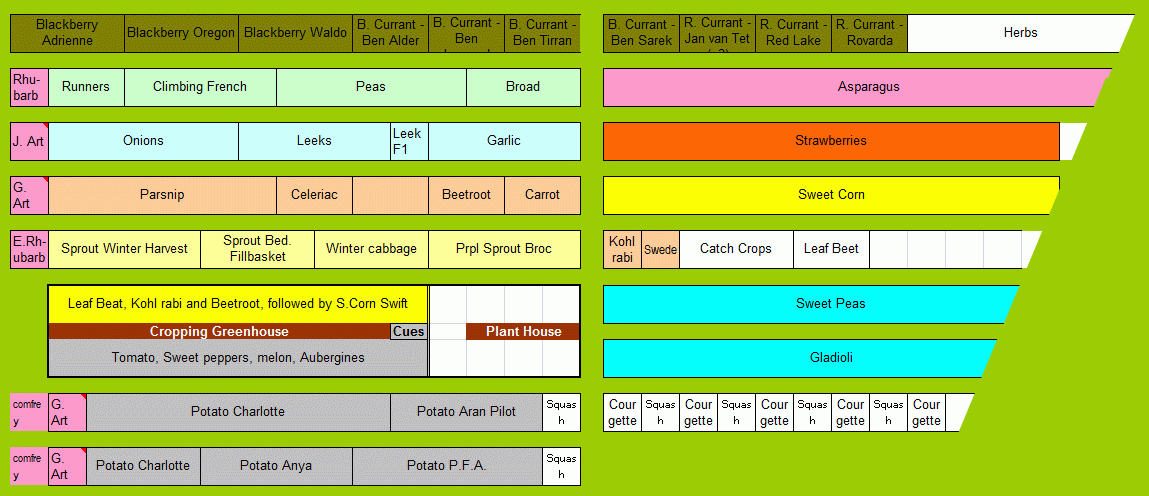
Been doing lots … but not had time to write it all up as yet, but here is a revised Crop Plan to show what is planted out as of the start of June

Crop Plan 2007 v7 (Click to enlarge)

Cropping Plan for 2011
Cropping Plan for 2014
Making a Cropping Plan Spreadsheet
Folk who say they are not very skilled at Spreadsheets have asked for help making a plan, using a Spreadsheet, so here are the steps I used in case it is helpful to anyone else. (You can click on each Thumbnail to see a larger, more readable, picture)
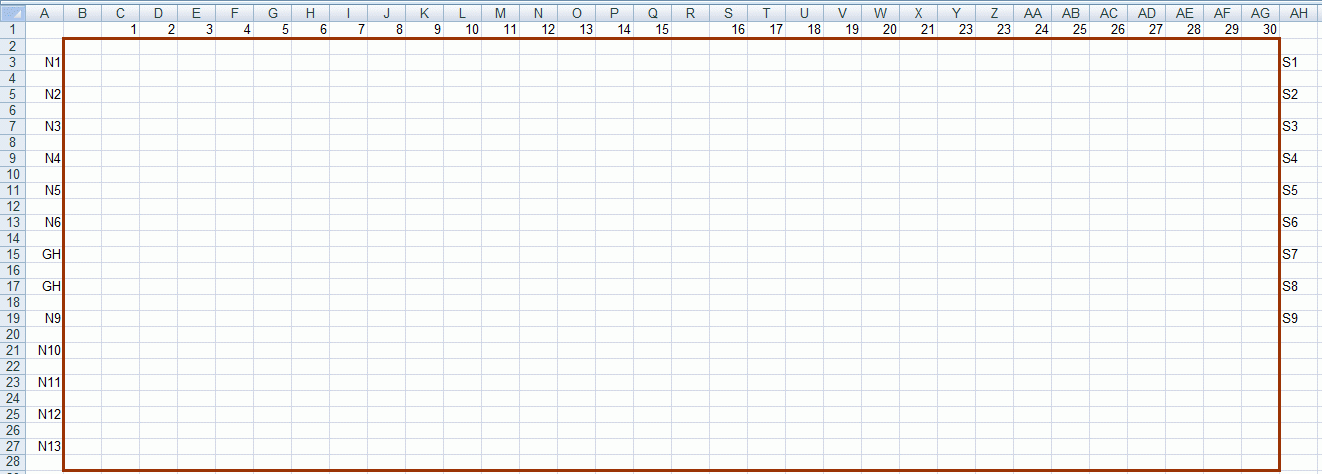
Step 1
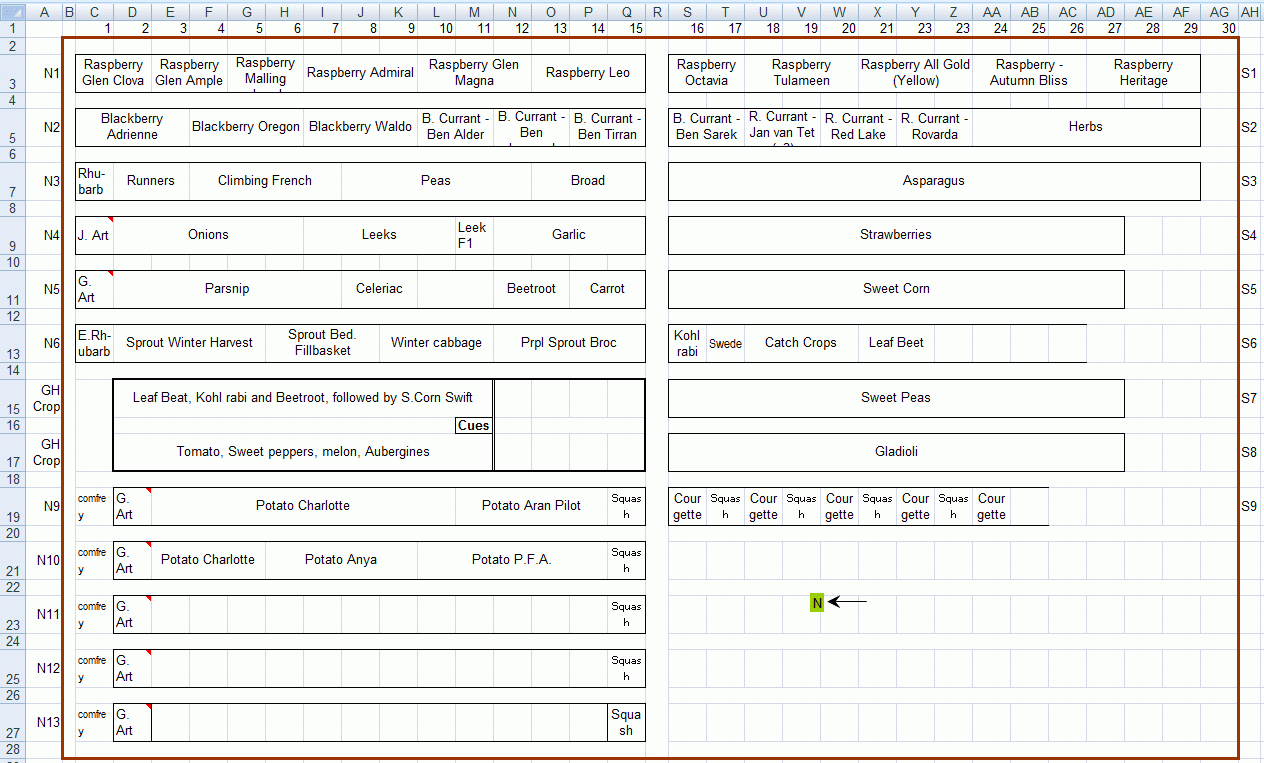
Measure the plot, and mark up the spreadhseet with “units”. Mine is about 30M wide, and I have allowed for a path in the middle (between columns 15 & 16). I have a number of “beds”, and I called these N1, N2, … for the ones at the North end, and S1, S2, … for the South ones. I also have a Greenhouse between beds N6 and N9.
I have left a blank row between each bed which will represent the path.
Next I want to indicate that the beds are wider than the paths. Exact size doesn’t matter, its not a scale drawing, just a schematic, so I made the “beds” rows wider [this allow allows more space for the labels I will put on them later, indicating which crop is where etc.]
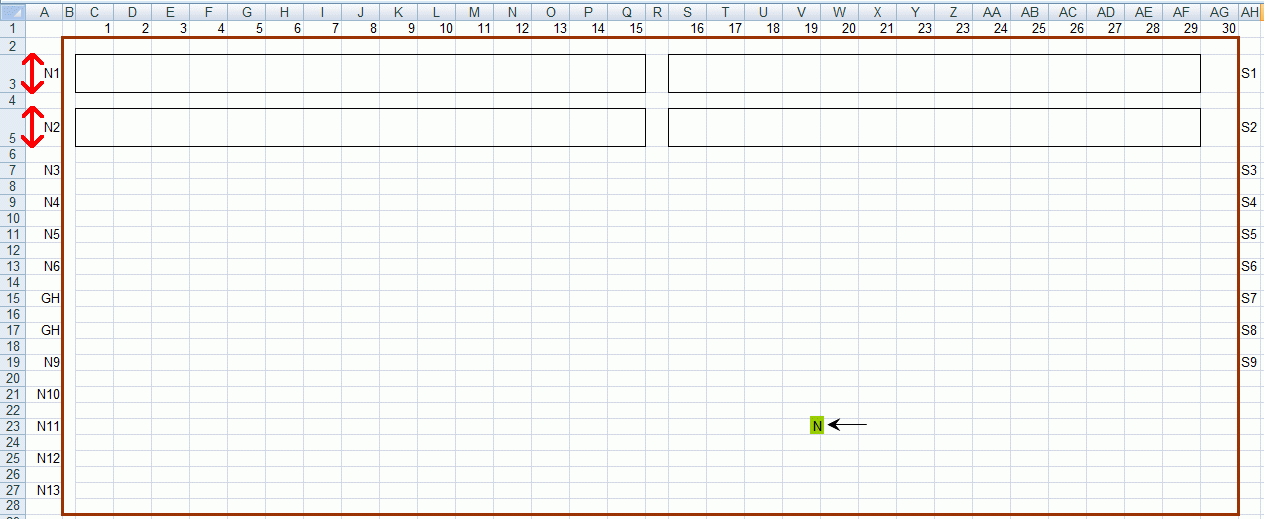
Step 2
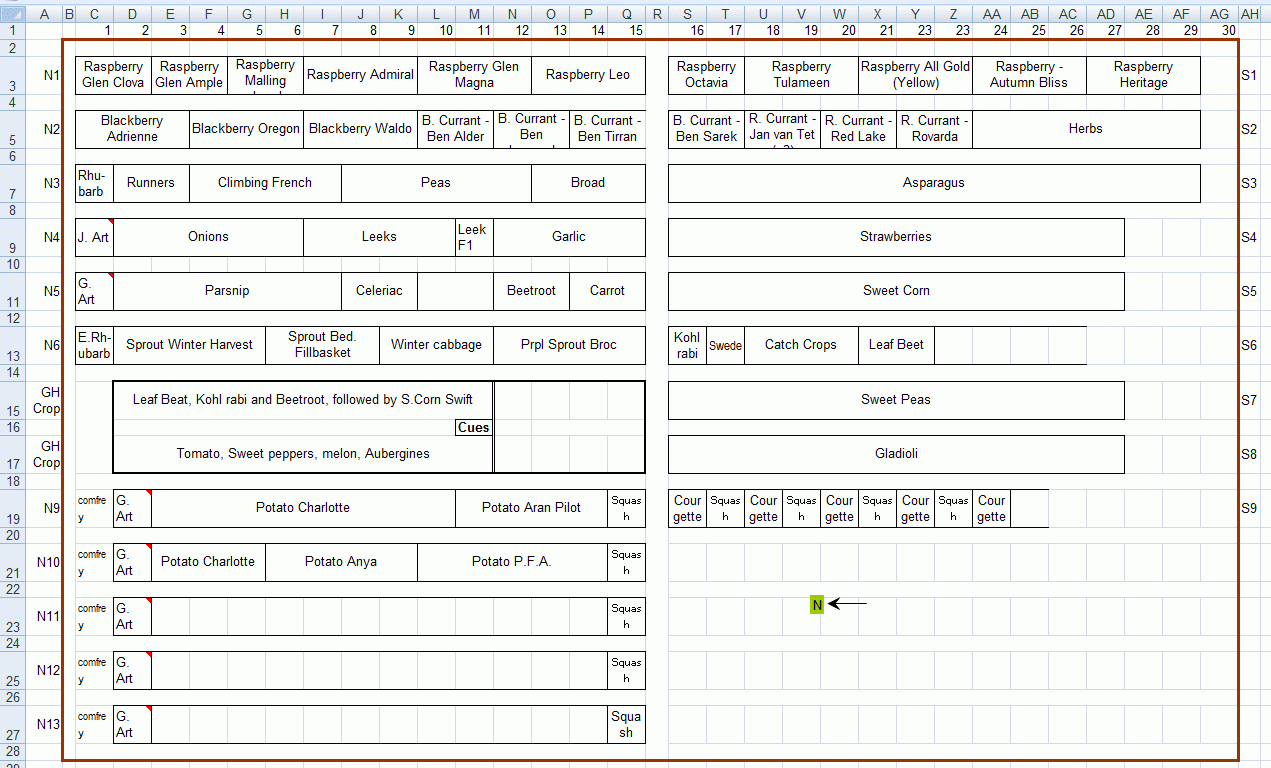
This shows that I have increased the height of the beds N1 and N2, and I have also drawn a border around the North and South beds, and made the vertical “path” columns a bit narrower (Columns “B” and “R”)
I then repeated that for all the other beds, and I drew a thicker border for my two greenhouses – the one on the left is about 30′ long, and the one on the right about 12′. I also drew a brown border around the whole plot:
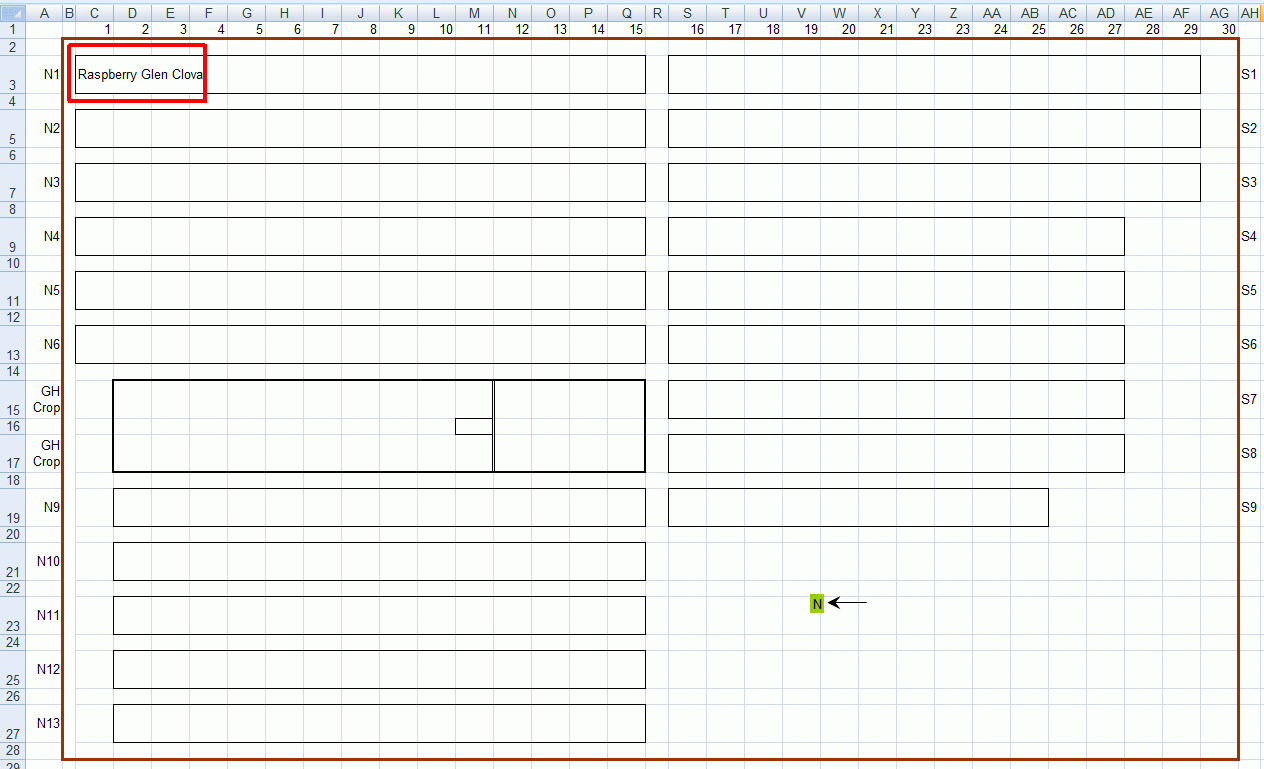
Step 3
The right side of my plot is at an angle, not straight / vertical, so I made some beds on the right side shorter to indicate this. I can only draw them the width of whole squares, so its a bit of an approximation how wide they actually are. I then started to put the names of my crops in – the first Raspberry crop is shown.
I then put in the names of all the crops.
Step 4
Note that I used the “Wrap Text” formatting function, so that the name wraps over multiple lines, rather than just being linear on a single line. This will allow me to get longer names in. I also used the “Merge cells” function, highlighting adjacent cells and then choosing “Merge Cells” to join cells together where a crop is wider than one unit (i.e. a Metre) along the row:
Step 5
and then I put a border around each “crop” to make it a bit easier to see where one crop name / label finishes and another starts. I reduced the size of the Font for some cells where I needed to cram some text in.
Lastly I coloured it in:
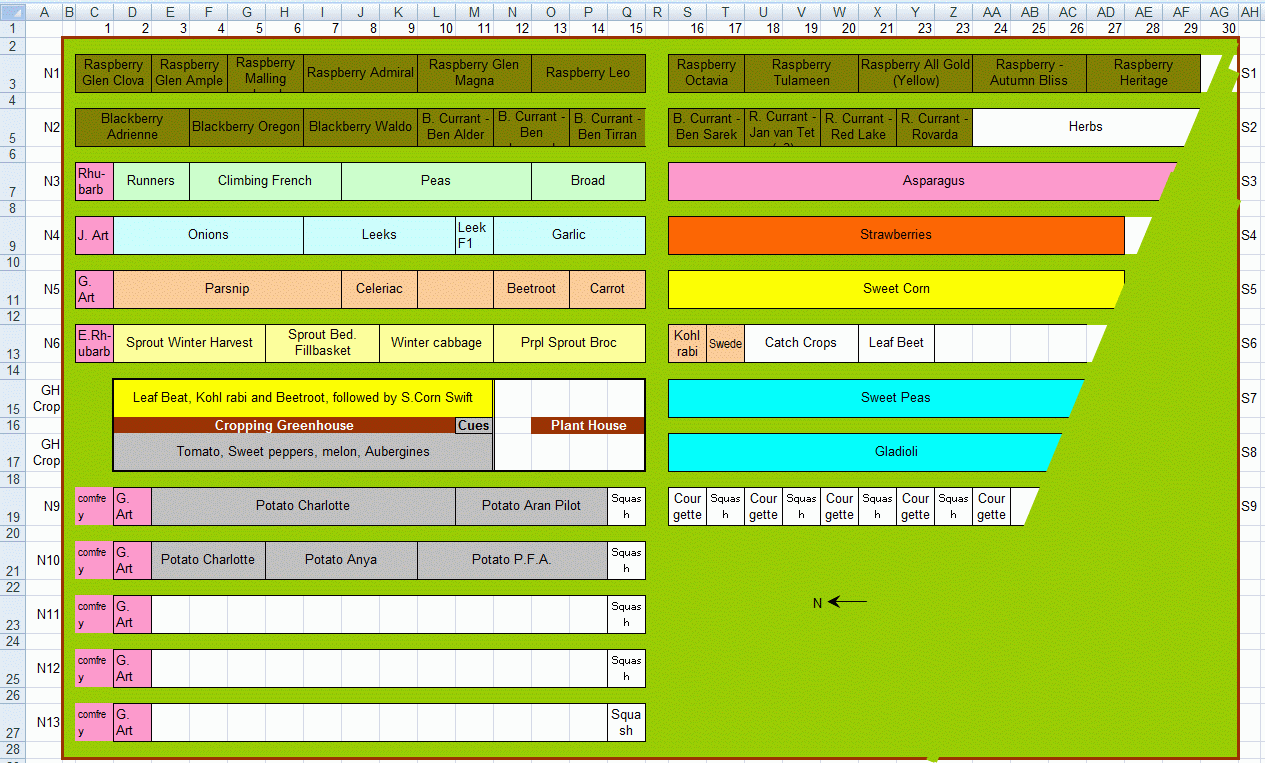
Step 6
I choose a different colour for each crop area in the crop rotation, and I used the “Insert : Shape” to insert some thick diagonal lines, on the right, to cover up the ends of the cells and simulate the fact that my plot has a diagonal edge on the right.
Making a Vegetable Seed Sowing Plan Spreadsheet
I also have a spreadsheet which I use as a Calendar for sowing my seeds. It looks like this (please note: click on any image for a larger version):
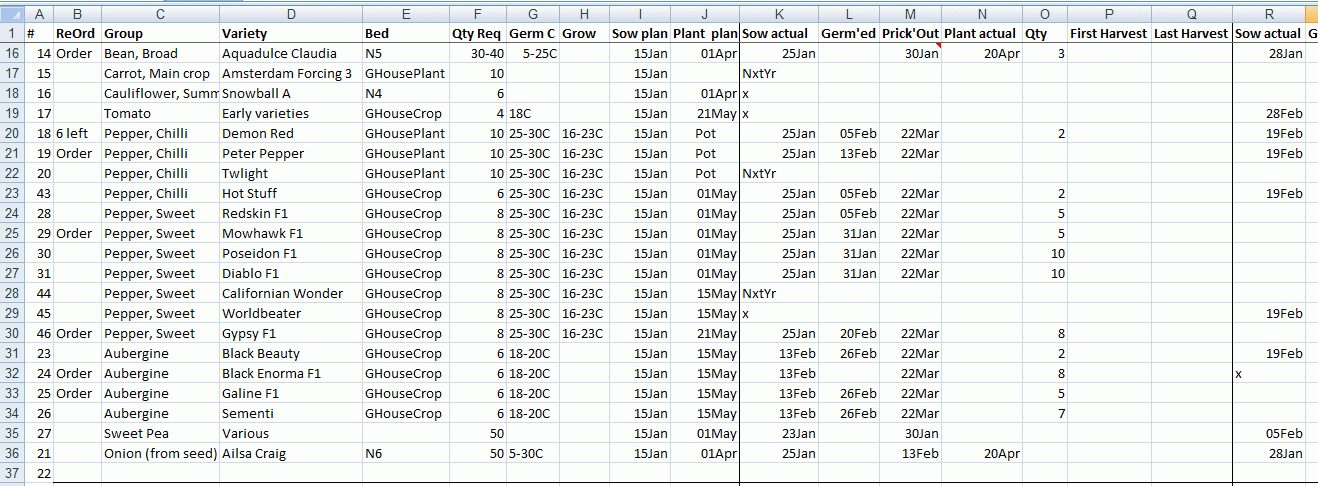
I probably have more columns and features than most people will need, so don’t worry it seems a bit overwhelming, I’ll explain the various column below and do please help yourself to any that you think might be useful, and chuck any you don’t need on the compost heap!
Let’s start with the important columns:

Columns C and D are the Type of vegetable and the Variety. I put these in separate columns as it can be handy to “filter” on, say, “Carrots”, and having the generic name in Column C all by itself makes that possible.
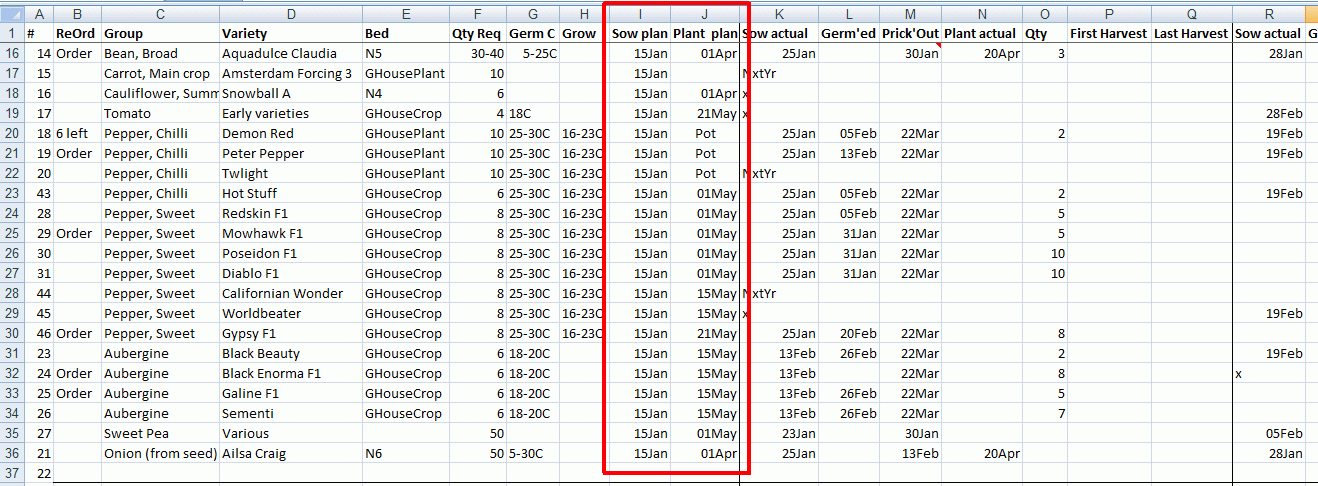
I enter the full date (i.e. including the year) in Columns I and J when I plant to Sow and Plant Out the crop. I sow nearly all my vegetables indoors, prick out, and then plant out some time later. If you sow direct then perhaps put “Direct” in the Plant Out column J.
I have put “Pot” next to 3 of the Chilli Peppers (Rows 20-22) as I grow these in containers, so they don’t get planted out as such.
I have formatted [all] the date columns to just show the Day / Month, this is so that I can resize the column to make it as narrow as possible so that I can fit more columns on any printouts. (I have widened the columns for these screenshots so you can see what is going on, but on my proper working copy they are as narrow as I can possibly make them! to save paper)
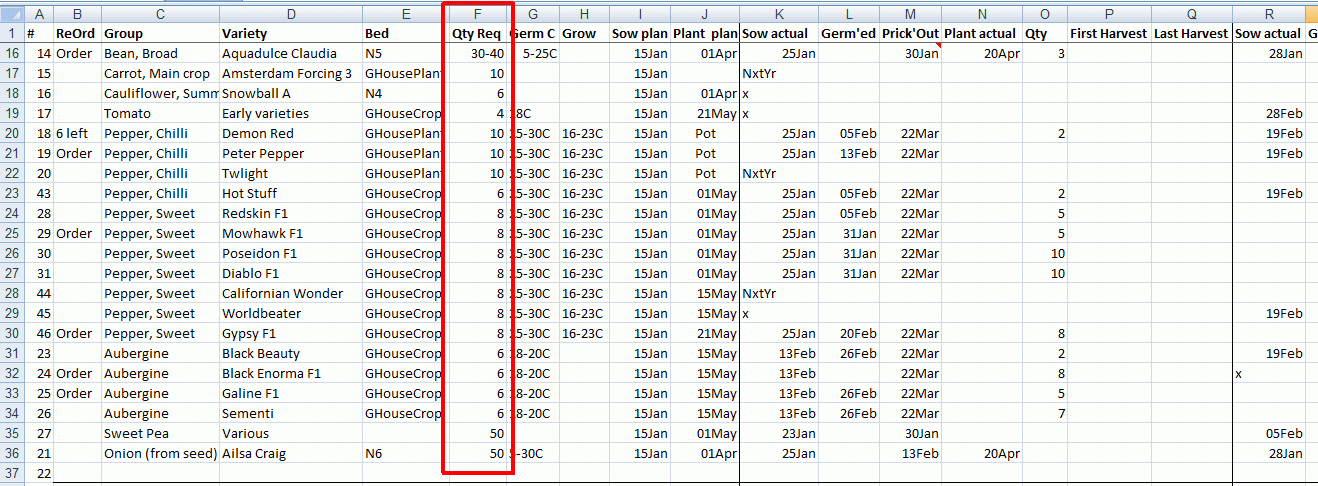
Column F shows the Quantity Required – i.e. the number of plants that I would like to grow. I then try to sow the right amount of seed to get that many plants. Sometimes I have far too many (although I am mean, so I tend not to sow much excess seed, preferring to keep it for next year instead!), but some things fail to germinate, or I kill them off by accident. The Quantity Required is based on experience in previous seasons, and over the years it has changed based on my family saying “Grow more” or “Don’t ever grow that again!”. I use a Notes column to record comments like that so that I can refer back to them later on.
In Column K I store the actual date on which I sowed the crop:
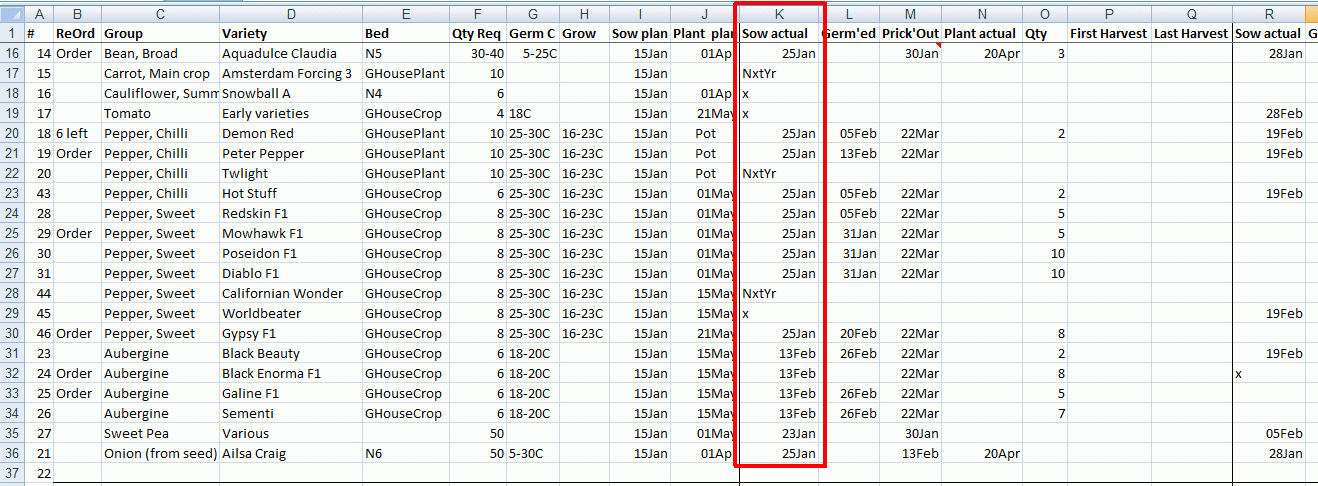
I put an X in this column if I am not intended to sow it ever again. Because I keep historical data I have details of those crops, from previous years, but perhaps I have decided not to grow that variety for some reason. You could “Hide” such rows, or MOVE them to the bottom of the spreadsheet, out of the way.
I also have crops that I want to sow Next Year (marked “NxtYr”), these might be varieties that I forgot to buy seed of this year, and have perhaps grown in previous years. This year I had a bit of a trial on Pepper varieties – I normally only grow one variety, but this year decided to try several different ones. I got carried away and bought seed packets of more varieties than I actually have space in the greenhouse to grow! so some of them will be sown “Next Year” instead.
In Columns L – N I record the dates that the seeds germinate, when I prick them out, and when I then plant them out:
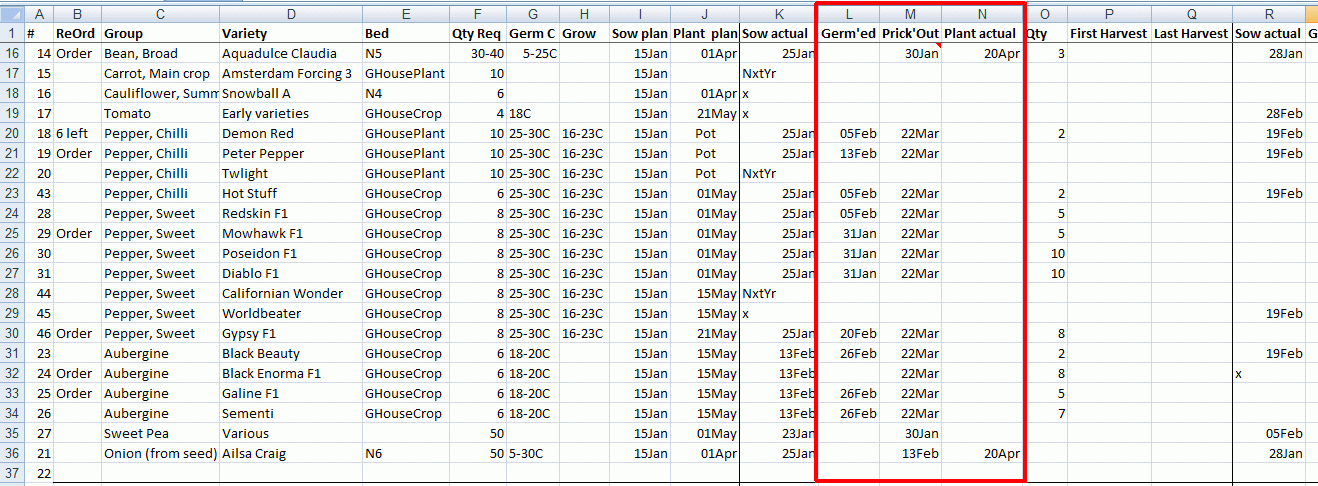
if you sow direct that probably isn’t relevant. I record it so that next year I can estimate when things will come out of the propagator, and when I need to plan time for pricking out, and planting out – e.g. if we are planning to go away for a holiday, or even a weekend in the middle of the Spring Propagation Season I adjust my sowing date so that nothing is needing pricking out whilst we are away.
In Column O I record how many plants are actually planted out:
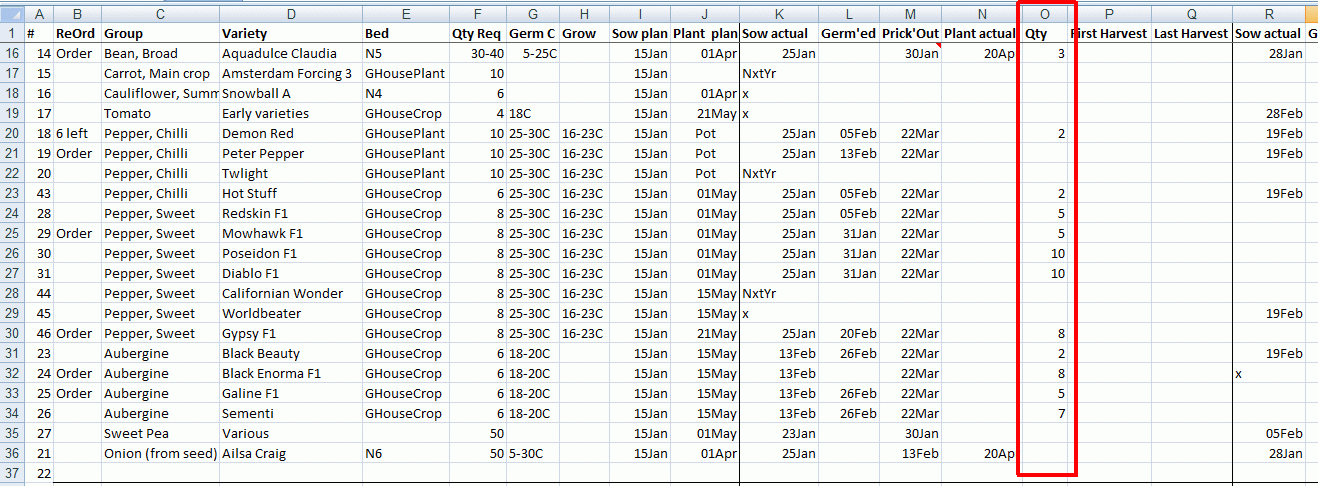
sometimes I lose some after pricking out, or don’t actually plant them all – giving spares away and so on. This quantity is important for any notes that say “Plant more”, and to compare how many I grew from one year to the next – its quite often the middle of Winter when the conversation comes up “We didn’t seem to have enough Sweetcorn for BBQ parties this year, I’m sure we grew more last year” … when in fact maybe we just had more parties!
Next are columns P – Q which record the date of the First and Last Harvest:

I have to admit these columns are more for Good Intentions that Actuals! although this year I have been recording such things on my Phone when I am in the veg patch. Perhaps I should have a Tag on each crop that I bring indoors on the day of the first harvest, and another when the crop is ready to be cleared. It is very useful information, so I recommend you try to record it, even though I am very lazy about it! The first harvest enables you to estimate when that will be, next year. Mrs K likes to know when she is likely to be able to cook some Cauliflower … or the first Sweetcorn and so on … otherwise I find that she has bought some from the Supermarket just as ours are ready!
The Last Harvest date helps with planning a follow-on crop. For example, “Can I plant Leeks after First Early Potatoes” or probably more accurately “Based on last years Sowing and Planting dates, when should I sow Leeks to be ready for planting after my First Early Potatoes”
Further to the right, in Column R onwards:
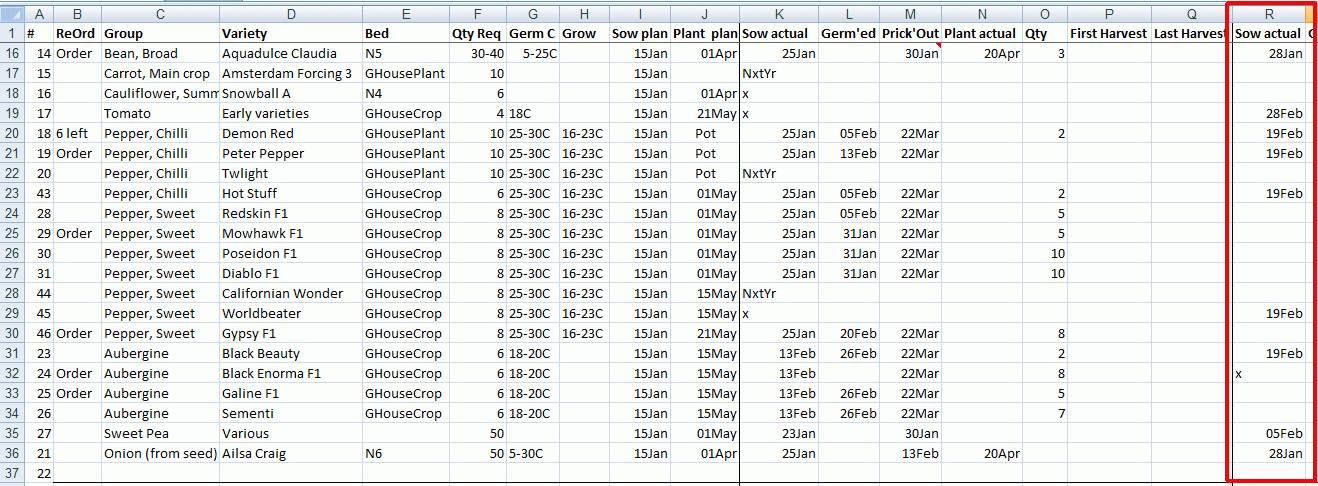
are the actual Sowing, Germination, Pricking out, Planting and First and Last harvest dates from last year. And further to the right still are the dates from the year before.
Each year I just insert new Columns K to Q for the new season’s data and that moves previous years’ data over to the right a bit more. That makes it easy to scroll sideways to see what I did in previous years (alternatives are to start a new spreadsheet, or a new TAB, each season, but then you would have to toggle backwards and forwards to make such comparisons)
Some other Bits and Bobs:
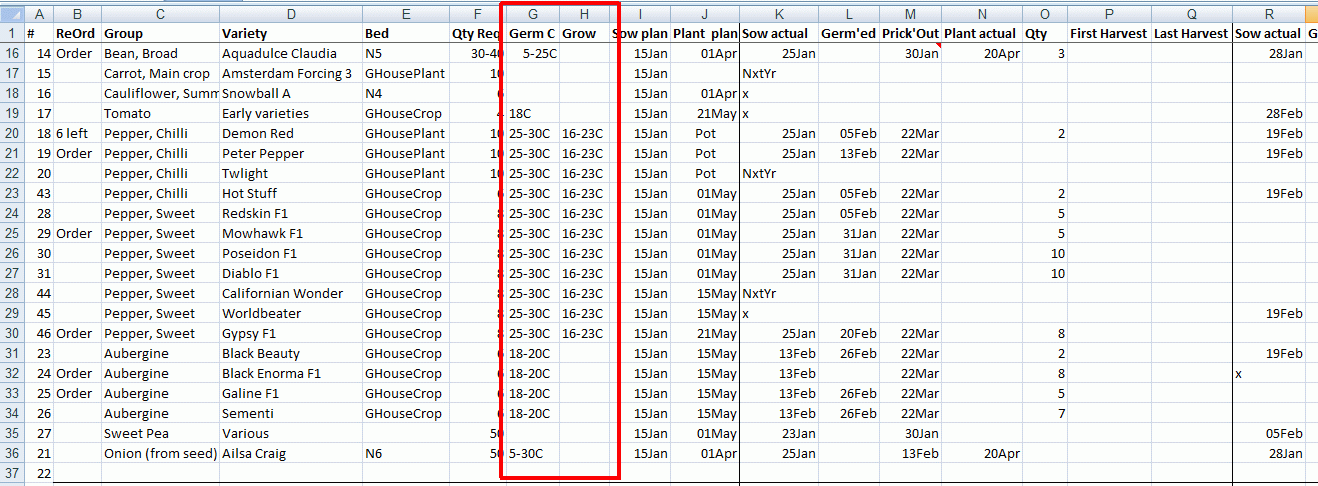
I have details of temperature for germination and growing. I could look it up in a book, but I find it handy to have it here. I check the seed packet and see if it recommends something in particular, and if so I note it on the spreadsheet, and I then use it as a reference for what temperature the seed need to germinate in the propagator, and how much heat they need to grow on, once they have germinated. You might not want to bother with those, or you might want a host of other useful columns. I have them in separate columns so that I can easily “Filter” (“What else needs this propagator temperature that I have to sow soon?”)
The columns may seem to be in a strange order (Re-order to the left, for example) but this is intentional so that I can select Columns C – J only for printing, which gives me a crib list to work from and prints the minimum number of useful columns. By having Re-Order to the left it does not get in the way of inserting new columns for Actual Dates next season.
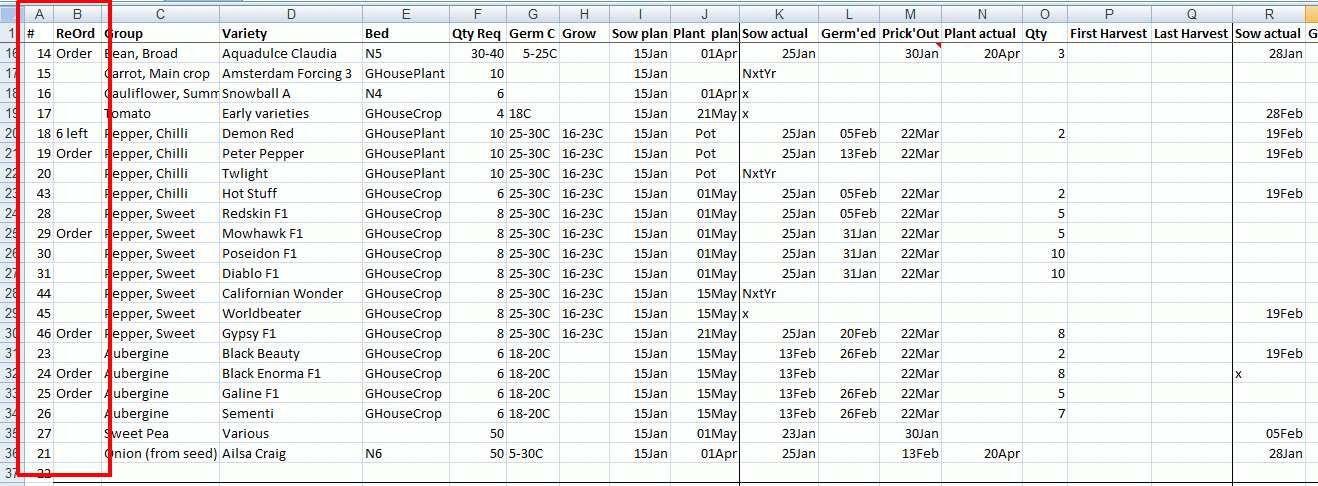
I have an ID column in Column A. This is just a unique identifier that I sometimes find helpful – so I can find something by that reference, if its variety name has been changed in situ or somesuch. I’m a Geek, if you aren’t then I doubt you need it! I will give you a tip for how to find the “next available number” later on, just for those folk that want such an ID number.
I use Column B to store Re-Order information. When I sow a packet of seed I record if it is all used (I need to ORDER more for next year), or how many seeds are left, or if there is “Plenty” for next year. I take into account how old the seed packet is, so if I think it is getting too old to sow any more, reliably, next year I mark it as “ORDER” anyway. I take a printout with me to the Seed Sales, in late Summer, when I can buy seed packets at 50p each, so that I can try not to buy things I already have plenty of (but even then I am not very disciplined!)
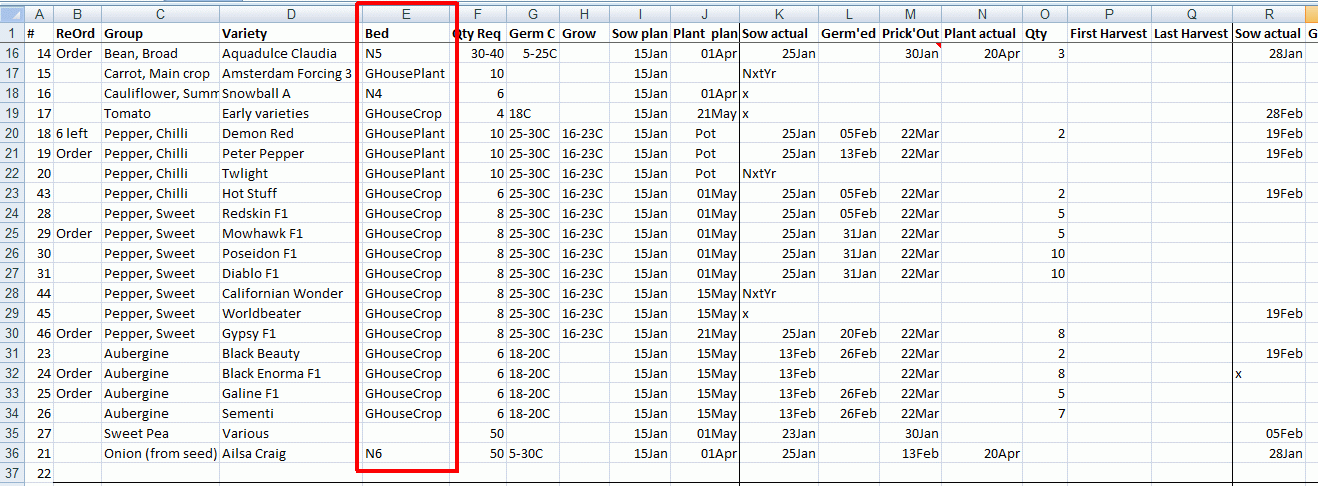
and finally in Column E I record the “Bed” that the crop will be grown in. This allows me to easily rotate the crops next year by changing N3 to N4, N4 to N5, N5 to N6 and N6 back to N3
Each year I probably grow a different variety of something, so I just insert a new row in the respective place and copy the relevant Planed Dates, and Propagator temperatures from an adjacent row of the same crop type.
To determine the next available ID number for Column A put this formula in call A1:
=”#” & MAX(A2:A999)+1
and this will show the next available number in cell A1, when you add that value
I use the “Auto Filter” option. This puts a pull-down arrow on each column heading, and I can use that to filter to just a specific vegetable type, or a planned sowing date or all the “Blank” Actual Sowing Dates so that I can see what is left to do (that list is more helpful if the spreadsheet is first sorted by Planned Sowing Date)
Next page (2008-2012 Asparagus Bed), or next topic: Greenhouses

I have put an electric fence around my veg. plot. No problem with rabbits since.
Regarding the “beds”, I have done mine similar, 1metre beds and 40cm paths, dug a full spit before fining down with the Mantis Tiller (electric).